Followers

31 January 2012

Stamping Flowers

Two Sheena Douglas stamps four different cards

This first card was mat and layered using the same
colours as used in the water colouring.

Stamped using Versafine black onyx, I then used my
very old set of water colours that I came across in a
box and hey presto they are great!

I edged the white card with a gold ink pad to
frame and used gold chalk just to dull down
around the flowers very lightly.

A green silk ribbon was then knotted in one corner
and adhered to the mat and layers at a jaunty angle.

A Marianne die was then used on the same green
card stock for foliage which adds interest to the
card without over shadowing the main image.
A piece of cream card stock was cut using and Xcut
die and a sentiment stamped onto it again in
Versafine black onyx ink and the edges inked
in green to match the overall colour scheme.


This card was made using a poppy stamp and
water coloured in the same way as above.

Red chalk was rubbed around the poppy lightly and a red
ink pad was rubbed on the edged of the white card
to frame the image. 

A vine die was used and cut into two smaller sections 
and glued into opposing corners of the stamped 
image to add further interest. 
The image was then layered on to the same dark green 
card stock used for the vine and foliage you see.

Red pearlescent card was mat and layered
and put through a Tri-emboss folder of leaf
patterns prior to adhering to 6" x 6" white card blank.

I used a computer sentiment again rubbed in red
chalks and edged in red ink.

Paper flowers were then cut and inked in the same
red tones and a black glitter centre added to look
like a poppy.

 This looks better in real life rather than this photo.


This card was the simplest of all four made.

I mat and layered black card with silver faded card
for the base layers on to A5 white card blank.

Added my stamped poppy as before but added a
polka dot green/white ribbon again layer on to
black card to frame.

Dark green foliage and a stamped sentiment in a
half circle.


I used two different coloured raffia papers
for the ribbons here to make it look
like a tag and mounted on to beige patterned
paper and light green mat and layered
  5" x 7" white card blank.

Paper flowers with glittered centres
and different shades of green foliage
was cut using punches.

Cream card was cut with an Xcut die,
stamped sentiment and put through
the Tri-embossed leaf folder.


Flutterbys

These two cards were made ready for a demo for Docrafts.

Large metallic butterfly topper from the Papermania range
has been adhered to a die cut white circle and silver
gel pen used to show a movement behind the butterfly.
Marianne die circle giving a lace effect on cream card
 to give a feature. 2" scalloped xcut circle punched
white card and silver gel pen dots on each scallop
then cream 1.5" xcut circle punched and embossed
using tri emboss folder foliage, and a stamp
with sympathy to finish. Xcut corner punch used on the
white card blank to soften the corners.


Lilac paper adhered to A5 white card stock,
then lilac mirror card and a garden scene layered on
top and adhered to the first layer with dimension pads.
Acetate strips cut and butterflies attached to these,
so it gives movement and stand proud of the
card background. Tag  shape cut out of lilac card
a hole punched and polka dot ribbon threaded
through and stuck to the layer with dimension pads and
a get well soon sentiment stamped on top.
Lilac gems placed in opposite corners for interest.


30 January 2012

Three Commissioned Cards

Decoupage mare and foal picture using pinflair silicone gel.
Cut out gold circle with a Marianne die to back decoupaged picture.
Mat and layer backing paper, once I had aged it with chalks.
Computer sentiments, circle sentiment cut out with xcut 2"
scalloped punch and cloud sentiment cut with xcut die, both aged with chalks, mounted
on dimension foam and added to backing layer.
Large foliage cut from a Marianne die stuck to backing layer.
Paper flowers stuck together with silicone gel and a button threaded with brown
cord tied into a bow in the centre.
Silk green bow to finish.


A Farmers Card - John Deere tractor picture decoupaged, using pinflair silicone gel.
Mat and layered green polka dot paper onto black card to frame, before sticking to
green card thread polka dot ribbon.  Die cut three gears using Tim Holtz die using the same green card, 
then I aged the gears using precious metals antique paint and a copper stamp.
Adhered to green card using brads.
I then mat and layered a different backing paper on to black card and put through an embossing folder (Crackle) to add interest and adhered to the same green card used in the main image.
Computer sentiment cut out using xcut cloud die and aged with chalks.


A Gamekeepers Card - the water fall image/mechanism from Design House Meadow Collection.
I used brown ribbon and a yellow/green brad as a pull, and green brads to hold the mechanism to the backing mat and layer. I used a backing sheet from the Meadow collection as this matched  the design perfectly and layered onto dark grey card stock and blue respectively and placed at jaunty angles to look more interesting.  Brown polka dot organza ribbon place across and tied into a knot and a computer sentiment with the name of the person added and card candi to highlight.


24 January 2012

Kids Craft Ideas

My first offering, two key rings made from pom poms. 
These were actually produced in a kit by Craft Planet and both came in one pack for a £1 - great pocket money fun!  Very easy to do and you have something you can use at the end of it, which is a bonus.


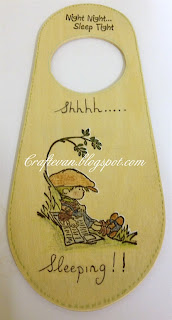
Second offering a door hanger, the picture shows the front and back of the bedroom door hanger  - in this case for a boy!
A blank door hanger was purchased from a craft supplier approx 69p and then two stamps were used, one either side and then coloured in.


Hand written messages added with a black Biro, and a stitching effect around the edges with a Sakura pen. 


For longevity these can be varnished, but it's up to the individual.

Again very easy make and something useful.

23 January 2012

Paper Rose Wreath etc

This wreath was made by using a Styrofoam ring as the base.
The roses where made buy cutting into squares, sheets of paper from an old unused diary, then cutting the squares in to circle spirals.  The spirals are then wound into a cylindrical shape and glued using white pva glue.  Once dry I painted each rose very randomly using bronze and silver precious metals paints.
Again once dry I used pinflair gel to adhere these to the Styrofoam wreath ring. 
I then sprinkled gold dust (24k) onto the roses to add a further shimmer and sprayed with spray and shine as this will adhere the gold dust and make the wreath shine a little at the same time.  Once dry I used a piece of brown lace wrapped around the wreath and tied into a bow for hanging.


The picture below shows two circular decorations these are
very quick and easy to make and are great if you want the kids to get involved.
I cut 16 pieces of double sided paper circles out
(this can be done using a punch), folded each circle in half and then glued alternate circles together. 
Prior to gluing the last circle in place, I used a cord  and tassle as shown in the picture, so once dry these can be hung.

These balls can be decorated to your hearts content, but I left these plain in this instance.


Cards using stamps

John Bryer wooden backed stamps by Papermania


This card was made by mat and layering a black piece of card behind a grunge striped paper (cannot remember who by).  A Tree stamped onto left hand side and shaded with pencils not so dark as to block out the striped paper.  A sizzix picket fence die was used to cut out brown Kraft card and a Marianne die of vines cut and weaved into the picket fence prior to sticking to the mat and layer. 
The topper was stamped on to white card with the John Bryer vintage stamp range and coloured using distress inks and cut out fairly close to the image and stuck to the card using dimension pads.
The sentiment was printed on to white card stock and cut out using an Xcut die and aged using chalks. Polka dot orange organza ribbon placed in loop for decoration.


This card again mat and layered with a triangle layer for added interest.  Topper stamped and cut with a parchment die then put into an embossing folder which helps to age the picture along with chalks.  Printed computer sentiment and Xcut die to cut out shape.


Cooks 70th Birthday Card

This card was made for my mums friends who will be 70 shortly and her great hobby is cooking.

House Mouse decoupage image mat and layered onto yellow and then black card stock.
Mat and layer lilac and light blue layers for first mat area and stick to A5 white card.
Mat and layer three strips of card that correspond to the picture, in this case yellow and pink with small bits of ribbon hanging out of the top for added interest, and stick onto first layer as shown in this picture.
Now stick your decoupaged picture onto these, along with card candi and beaded flowers.  The sentiment was mat and layered on to same lilac and blue card and the first layer.

A bright simple card that is interesting and clean.


This second picture is of the insert of the above card. 
I managed to find a birthday recipe text online that suited this card.
The main colour and flower line is from a Nitwit cd.


I am very pleased how this turned out, hope you enjoy!

19 January 2012

One Stamp two different cards

John Bryers vintage stamps from Papermania

The first card was made using a piece of blue card, embossed through bigshot and stamped with a clock stamp all over to give a vintage/grunge look and edged with the same ink pad as used for the clocks.  Two triangle pieces of Portobello Road paper, again inked around their edges and stuck to blue card stock.  A clock and hands were cut out using sizzix Tim Holtz Die and coloured using precious metals 'copper' and a brad put in to hold the clock hands.  Raffia ribbon wrapped around the card prior to sticking the clock face onto the card.
Stamped onto white card stock, the boy flying his kite, coloured in using distress inks and then cut out with a parchment shape die through the bigshot.  Distress the stamped parchment piece using chalks as this gave a subtle ageing effect.  The sentiment was made with the computer and again cut out with an Xcit die in the shape of a cloud.  A piece of silver and gold ribbon tied into a bow was then stuck with silicone in the opposite corner to the sentiment to balance the card.


This second card was made using the same stamp as before, coloured and cut out in the same way.  This time a piece of black card, red card and Portobello Road blue dot paper was mat and layered together to create the background.  I then punched holes in the topper and laced twine through and wrapped around the mat and layer prior to attaching the the card itself.  The topper is effectively hanging in mid air only being held by the twine.  Again a computer sentiment was printed and cut out with a 2" scalloped round punch and chalked used to colour and age.


Many different cards or household items can be made using the same stamp.

11 January 2012

Grunge/Distressed Look

Co-ordinations chocolate brown with blue core paper cut two fit A5 card sand co-ordinations paper and use knife to scrap edges to age.

Use Portobello road checked paper again use knife to scrap edges to age and use either distress ink to edges or chalks i.e gold/yellow colour, like wise cut a long narrow strip of contrasting mellow paper again distress edges as before.  Wrap hessian string around top of checked paper prior to sticking the mellow paper on top.  Checked paper is glued to co-ordinations on a jaunty angle just to give a different look.

Clock was cut using sizzix 'Tim Holtz' clock and coloured using precious metals, hands are attached using a brad. Stamp (Bryers vintage) onto white card stock, then cut out using a parchment die, distress using chalks or distress inks. Maroon ribbon stuck in bottom corner and sentiment aged in the same way.


10 January 2012

Hot Diggity Dog - Notelet


A Quick and simple notelet.

Mat and layer onto a small white card.

Using a topper and sentiment place onto notelet add
a ribbon and four small gems.

All done!


9 January 2012

Flower Paper Ball

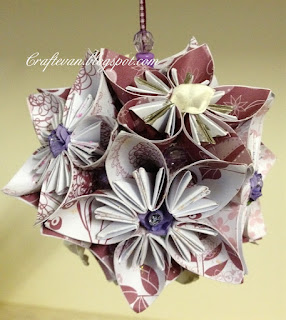
This is another flower paper ball made using Papermania Pink Capsule Collection.

Lilac flowers, gems, glitter and precious metals onto some petals.

These take a long time to make as each flower has five petals and twelve flowers make a ball.

Great talking point and house decor.


8 January 2012

Friends


DL card with lilac edging.  Mat and layer two pieces of paper and lilac backing paper.
Write a large F onto one mat and layer and write the verse on the other making the 'd' in friend have a long tail as the stamped image once coloured and cut out will look as if it is hanging from these two larger letters.
Stamp the watering can from the Hot Diggity Dog range of stamps onto card layer and paint using precious metals platinum this makes the watering can look like metal.
Lilac flower with button and silk thread tied into a bow in one corner and lilac ribbon knotted in the other.


Tile Pot Stands

Tile Pot Stands -  Here I have used stamps on to tiles and coloured in with pencils.

This first tile I stamped using the new Hot Diggity Dog stamps six in total to make a scene at the
Beach.


This tile was stamped using Portabello Road stamps four in total to mark a very English scene.


This third tile various stamps were used, Country Companions background scene and daisies, Hot Diggity Dog Watering can and flower pot man and John Bryers Vintage boy and dog stamp.


HOPE THESE ARE WORTH THE EFFORT!

3 January 2012

Flutterby - Quilling and Embossing

Flutterby - Quilling and Embossing

This is an 8" x 8" Blank White Card, a sheet of pink capsule collection paper mat onto
green card layer.
 

Four flourishes cut from green Hot Diggity Dog backing paper and all flowers quilled from pink capsule collection paper. 


Flower edges inked and glittered and pearl gems placed into centre of larger flowers.

 
Pink polka dot ribbon knotted across bottom left corner to add interest.
4" Doyle with edges inked to blend into colour scheme.
 
 
Pink capsule collection paper put through tri-boss heart embossing folder.

 
Two butterfly toppers glued back to back so when the wings are lifted up you see the same design both sides
 
 
Gems added to body of butterfly to add dimension and a sentiment from Hot Diggity Dog decoupage.

Bunting - Do Craft Demo

Bunting - 'Do Craft Demo'


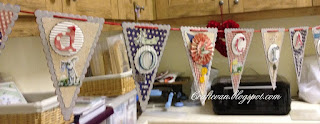
 This bunting was made using Xcut Bunting Scallop Dies.

Grey marble card was cut using the largest die, then using the second largest die cut portabello road paper
ink the paper and card edges prior to sticking paper on to card.
 

Using a small hole punch tool make two holes at the top of each bunting triangle and thread raffia ribbon paper trough spacing the bunting as required.


Using Xcut 2" round punch cut enough white circles for the word you are wanting to display in this case
"DO Craft Demo" Ripple the white card and ink edges, place what letters you are using on to ripple circle using dimension stickers or silicone glue.


Now decorate bunting as required.  Here I have used several technique's, such as quilling, rubber stamping, die cutting rosettes, decoupage and toppers etc.


I have used all Design Objective products on this bunting. Diggity Dog, Woodland Friends, Country Companions, Paper flowers, Gems, Charms


Portabello Road buttons and mini flags.


 The two end bunting flags are smaller than the others to denote a start and ending.


If you would like to leave any comments good or otherwise would be appreciated.

Hot Diggity Dog - Hoppy Birthday


 D L Card
Hot Diggity Dog

Mat and layer Lilac and Green Diggity Dog backing paper, wrap satin paw print ribbon on to bottom mat and layer and green organza ribbon bow to right hand side.

Decoupage picture of Hot Diggity Dog with hopping frogs mat and layer with brads in two corners and lilac paper flower with lilac button with silk ribbon thread into a bow.

Using Hot Diggity Dog sentiment stamp  "hoppy Birthday"


6" X 6" White Card using Hot Diggity Dog backing paper mat onto scalloped mirror card.
Satin brown ribbon ruffled and stitched and double sided brown and blue ribbon into knot, place an inch up from bottom of mat and layered piece and stick to main card.

Hot Diggity Dog Pyramage again mat onto blue card and glued onto original mat and layer.

Use sentiments from decoupage sheet "Bird Watching" - "Happy Birthday"

These cards can be used for male or female cards.
Hope this has given some inspiration - have fun!

2 January 2012

Get Well - Heart Rate Card

8" X 8" Square 300gsm Card Blank.


Card blank covered in plaid backing paper with pink and green corners cut with big shot and embossed.
Two flourished cut, one pink, one green, again placed under each corner of mat and layer of black and silver card with a House Mouse Decoupage picture with green polka dot organza ribbon tied into a bow in top left hand corner. Get Well sentiment again mat and layered as the main scene. 
Papermania gems placed in a row of three to add interest.

This card was made for a neighbour who's friend has just had a heart attack and they wanted something humorous.

Traditional Christmas Card

This is an 8" x 8" 300gsm bracket shaped white card.


Covered in a plaid backing paper and shaped to card.

Decoupage/Trinitage Christmas scene with silver
scalloped backing card.

Two flourishes cut with big shot and die, one green and gold paper and one in red mirror card.  Place red one in left hand bottom corner and lay backed Christmas scene glued in place over. Green flourish in top right hand corner glued in place with silk red flower and embroidered green brad in the centre (V & A Brad).
Computer generated sentiment printed on white card stock and cut out with Xcut scalloped circle punch, coloured with red chalk and edges coloured in red ink, backed onto mirror card and cut out with Xcut circle punch and stuck on to card with large dimension pad.  To balance card use two holly/berry rub-ons in bottom right
hand corner.